
PROFESSIONAL DOCUMENTATION
Technical resources.
Options, finishes, measuring and maintenance, with the full catalogue sheets.
Choose the system.
The right system,
| System | Opening / use | Selection criteria |
|---|---|---|
| Roller screens | Windows or doors | Mesh that rolls into a cassette. |
| TECH.22 | Four configurations | 22 mm thick for a discreet installation. |
| TECH.40 | One or two leaves | A clear passage with a 5 mm bottom guide. |
| TECH’N’ROLL | One or two leaves | Lateral movement. 6,5 mm bottom guide. |
| ALIZÉ 80 · 100 · 130 | Large motorised openings | Vertical rolling with ZIP guides. |
| Sliding screens | Sliding windows or doors | A frame that slides sideways along the tracks. |
| Fixed screens | Continuous protection | Rounded or flat profile. Special shapes with MOSQUIFIX. |
| ELITE DOOR | Hinged opening | Automatic return. No floor profile. |
Check dimensions, opening direction, supporting surface, obstacles and operating access.
Mesh and accessories.
The mesh makes the difference.
Enlarge the sheet and diagrams ↗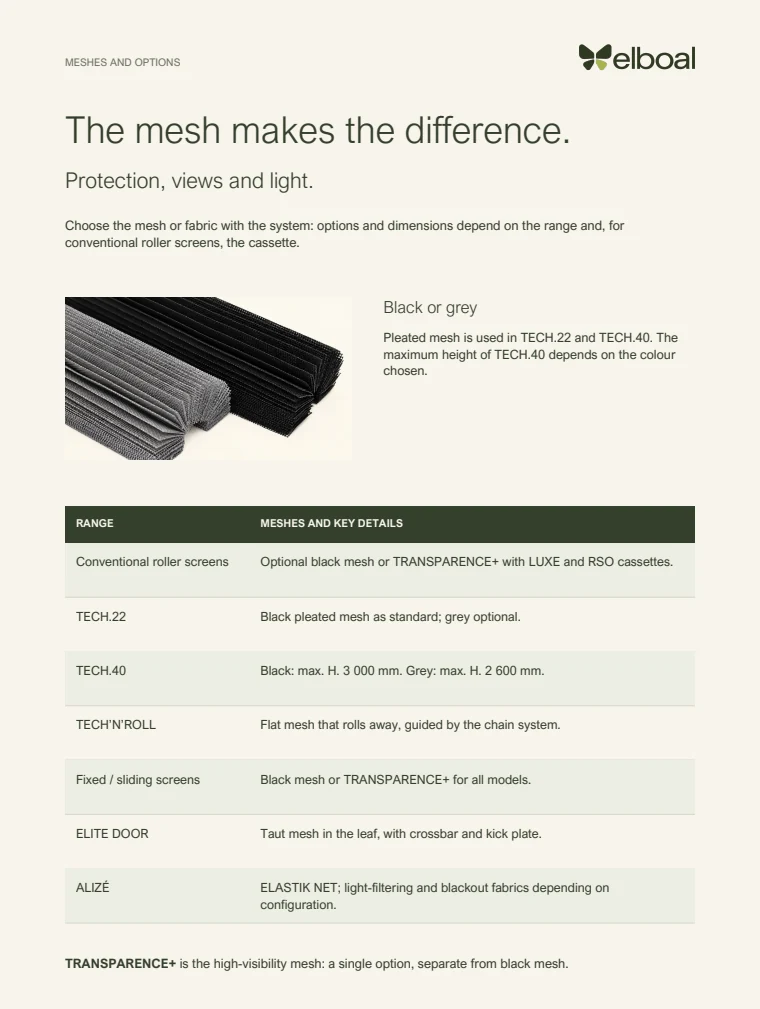
Read the full technical sheet text
MESHES AND OPTIONS
The mesh makes the difference.
Protection, views and light.
Choose the mesh or fabric with the system: options and dimensions depend on the range and, for
conventional roller screens, the cassette.
Black or grey
Pleated mesh is used in TECH.22 and TECH.40. The
maximum height of TECH.40 depends on the colour
chosen.
RANGE MESHES AND KEY DETAILS
Conventional roller screens Optional black mesh or TRANSPARENCE+ with LUXE and RSO cassettes.
TECH.22 Black pleated mesh as standard; grey optional.
TECH.40 Black: max. H. 3 000 mm. Grey: max. H. 2 600 mm.
TECH’N’ROLL Flat mesh that rolls away, guided by the chain system.
Fixed / sliding screens Black mesh or TRANSPARENCE+ for all models.
ELITE DOOR Taut mesh in the leaf, with crossbar and kick plate.
ALIZÉ ELASTIK NET; light-filtering and blackout fabrics depending on
configuration.
TRANSPARENCE+ is the high-visibility mesh: a single option, separate from black mesh.
The detail that adapts the solution.
Enlarge the sheet and diagrams ↗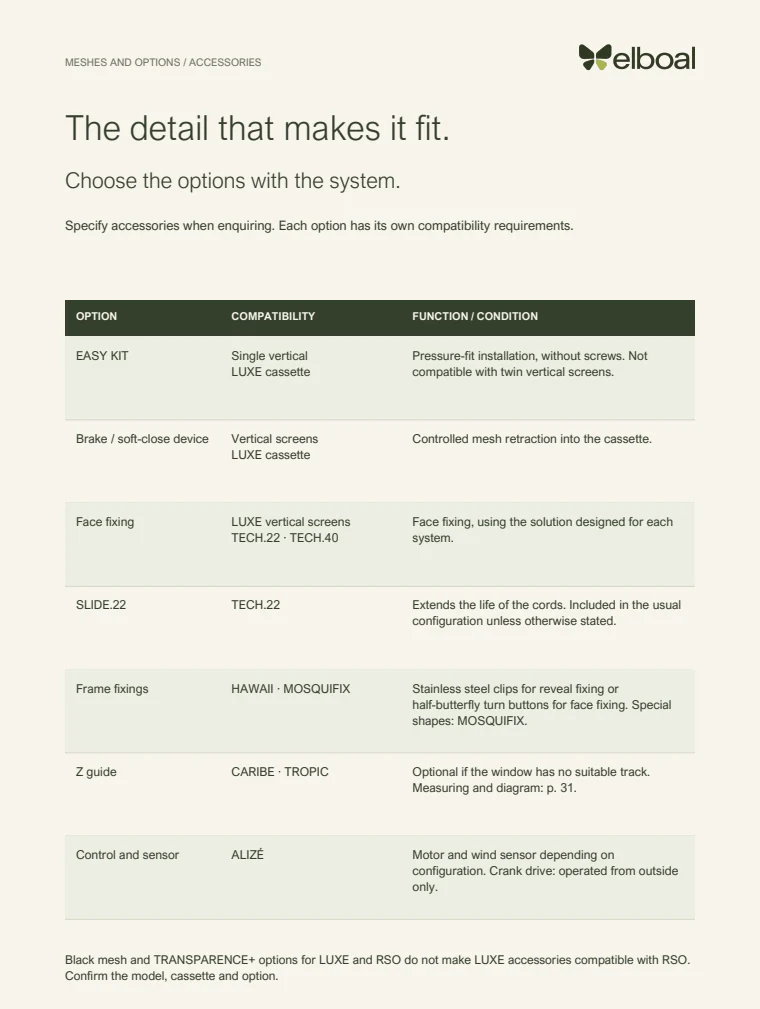
Read the full technical sheet text
MESHES AND OPTIONS / ACCESSORIES
The detail that makes it fit.
Choose the options with the system.
Specify accessories when enquiring. Each option has its own compatibility requirements.
OPTION COMPATIBILITY FUNCTION / CONDITION
EASY KIT Single vertical
LUXE cassette
Pressure-fit installation, without screws. Not
compatible with twin vertical screens.
Brake / soft-close device Vertical screens
LUXE cassette
Controlled mesh retraction into the cassette.
Face fixing LUXE vertical screens
TECH.22 · TECH.40
Face fixing, using the solution designed for each
system.
SLIDE.22 TECH.22 Extends the life of the cords. Included in the usual
configuration unless otherwise stated.
Frame fixings HAWAII · MOSQUIFIX Stainless steel clips for reveal fixing or
half-butterfly turn buttons for face fixing. Special
shapes: MOSQUIFIX.
Z guide CARIBE · TROPIC Optional if the window has no suitable track.
Measuring and diagram: p. 31.
Control and sensor ALIZÉ Motor and wind sensor depending on
configuration. Crank drive: operated from outside
only.
Black mesh and TRANSPARENCE+ options for LUXE and RSO do not make LUXE accessories compatible with RSO.
Confirm the model, cassette and option.
Colours and finishes.
A finish in harmony.
Enlarge the sheet and diagrams ↗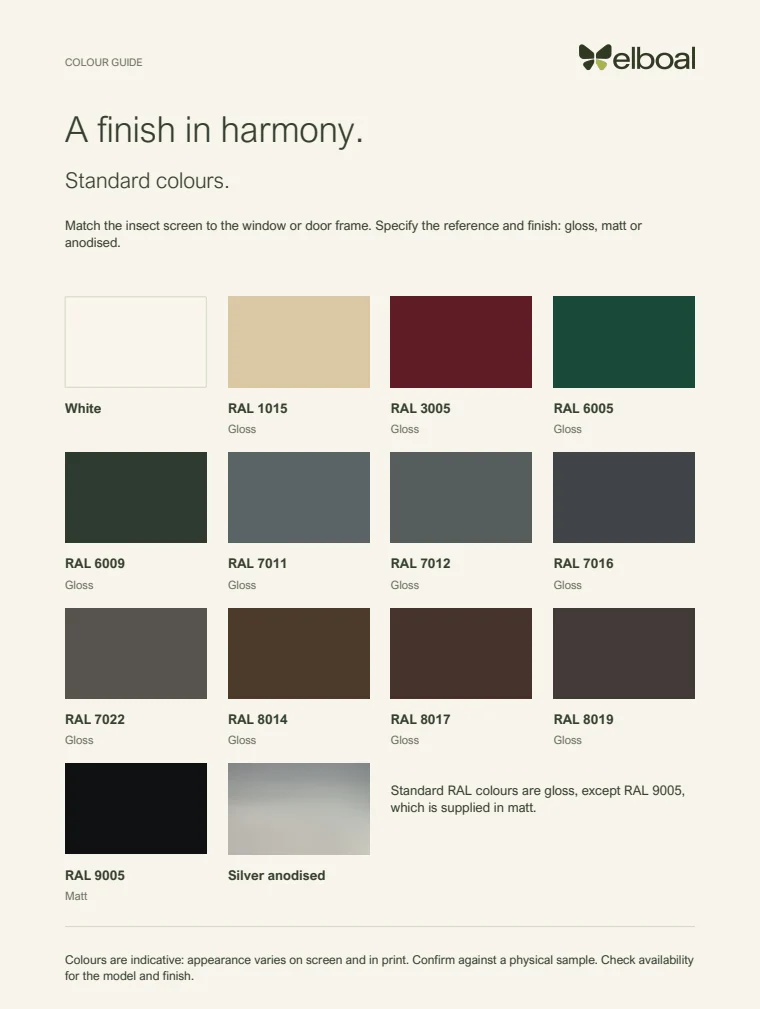
Read the full technical sheet text
COLOUR GUIDE
A finish in harmony.
Standard colours.
Match the insect screen to the window or door frame. Specify the reference and finish: gloss, matt or
anodised.
White RAL 1015
Gloss
RAL 3005
Gloss
RAL 6005
Gloss
RAL 6009
Gloss
RAL 7011
Gloss
RAL 7012
Gloss
RAL 7016
Gloss
RAL 7022
Gloss
RAL 8014
Gloss
RAL 8017
Gloss
RAL 8019
Gloss
RAL 9005
Matt
Silver anodised
Standard RAL colours are gloss, except RAL 9005,
which is supplied in matt.
Colours are indicative: appearance varies on screen and in print. Confirm against a physical sample. Check availability
for the model and finish.
Materials and nuances.
Enlarge the sheet and diagrams ↗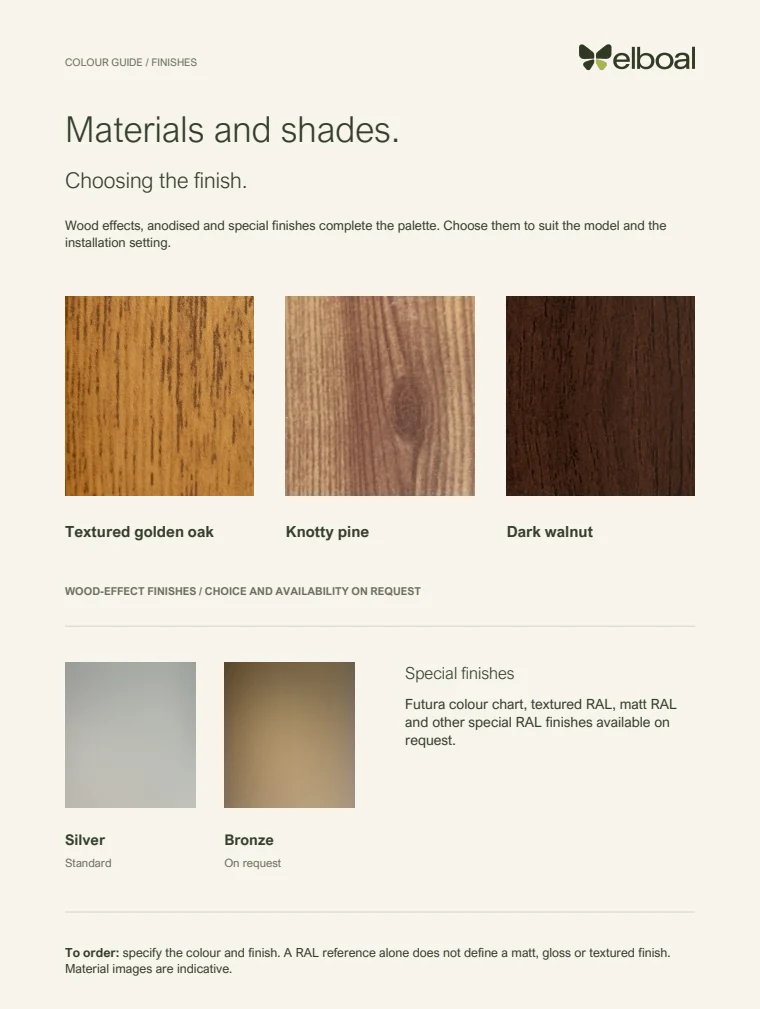
Read the full technical sheet text
COLOUR GUIDE / FINISHES
Materials and shades.
Choosing the finish.
Wood effects, anodised and special finishes complete the palette. Choose them to suit the model and the
installation setting.
Textured golden oak Knotty pine Dark walnut
WOOD-EFFECT FINISHES / CHOICE AND AVAILABILITY ON REQUEST
Silver
Standard
Bronze
On request
Special finishes
Futura colour chart, textured RAL, matt RAL
and other special RAL finishes available on
request.
To order: specify the colour and finish. A RAL reference alone does not define a matt, gloss or textured finish.
Material images are indicative.
Measuring and installation.
Precise measuring.
Enlarge the sheet and diagrams ↗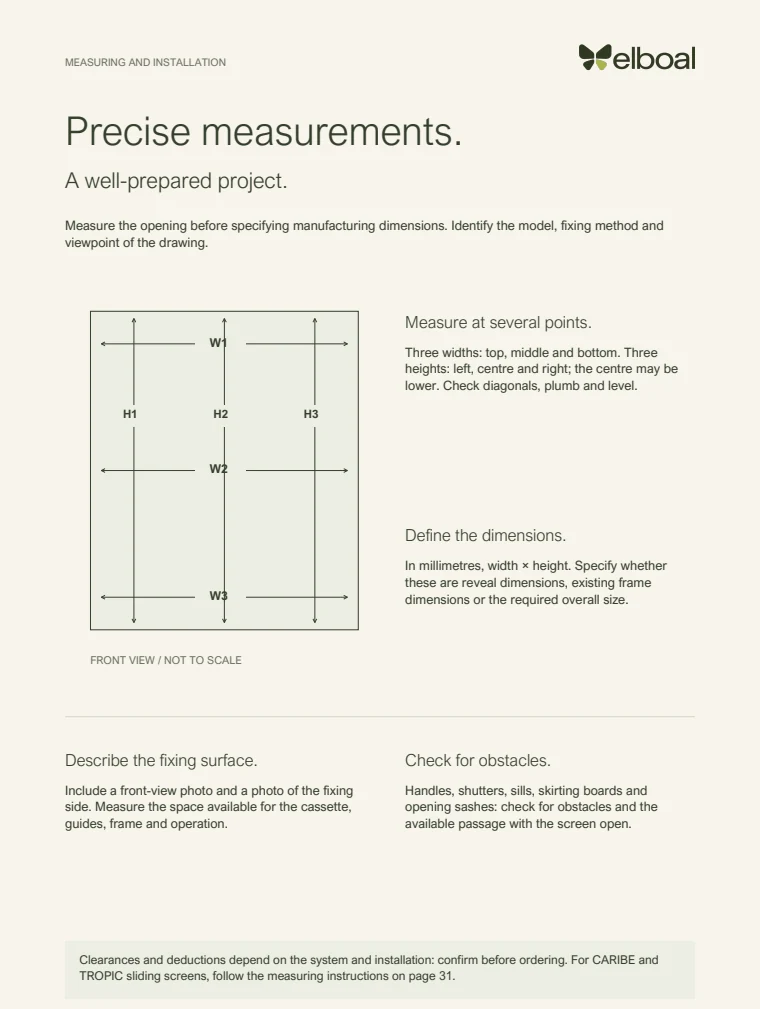
Read the full technical sheet text
MEASURING AND INSTALLATION
Precise measurements.
A well-prepared project.
Measure the opening before specifying manufacturing dimensions. Identify the model, fixing method and
viewpoint of the drawing.
W1
W2
W3
H1 H2 H3
FRONT VIEW / NOT TO SCALE
Measure at several points.
Three widths: top, middle and bottom. Three
heights: left, centre and right; the centre may be
lower. Check diagonals, plumb and level.
Define the dimensions.
In millimetres, width × height. Specify whether
these are reveal dimensions, existing frame
dimensions or the required overall size.
Describe the fixing surface.
Include a front-view photo and a photo of the fixing
side. Measure the space available for the cassette,
guides, frame and operation.
Check for obstacles.
Handles, shutters, sills, skirting boards and
opening sashes: check for obstacles and the
available passage with the screen open.
Clearances and deductions depend on the system and installation: confirm before ordering. For CARIBE and
TROPIC sliding screens, follow the measuring instructions on page 31.
Points to check.
Enlarge the sheet and diagrams ↗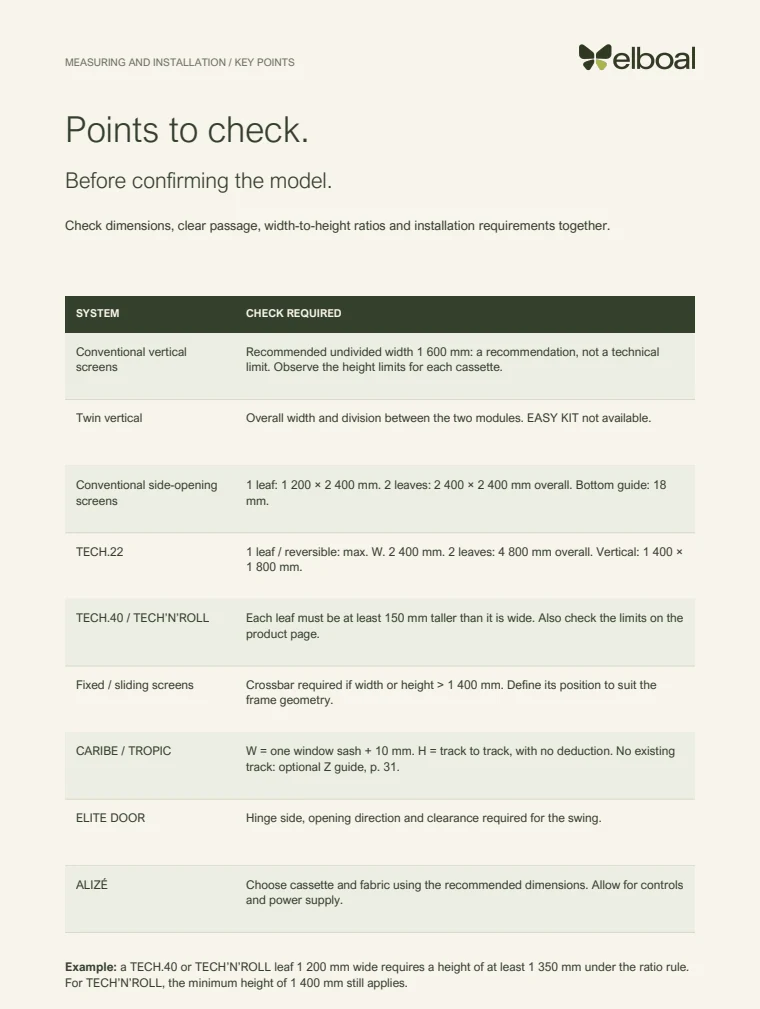
Read the full technical sheet text
MEASURING AND INSTALLATION / KEY POINTS
Points to check.
Before confirming the model.
Check dimensions, clear passage, width-to-height ratios and installation requirements together.
SYSTEM CHECK REQUIRED
Conventional vertical
screens
Recommended undivided width 1 600 mm: a recommendation, not a technical
limit. Observe the height limits for each cassette.
Twin vertical Overall width and division between the two modules. EASY KIT not available.
Conventional side-opening
screens
1 leaf: 1 200 × 2 400 mm. 2 leaves: 2 400 × 2 400 mm overall. Bottom guide: 18
mm.
TECH.22 1 leaf / reversible: max. W. 2 400 mm. 2 leaves: 4 800 mm overall. Vertical: 1 400 ×
1 800 mm.
TECH.40 / TECH’N’ROLL Each leaf must be at least 150 mm taller than it is wide. Also check the limits on the
product page.
Fixed / sliding screens Crossbar required if width or height > 1 400 mm. Define its position to suit the
frame geometry.
CARIBE / TROPIC W = one window sash + 10 mm. H = track to track, with no deduction. No existing
track: optional Z guide, p. 31.
ELITE DOOR Hinge side, opening direction and clearance required for the swing.
ALIZÉ Choose cassette and fabric using the recommended dimensions. Allow for controls
and power supply.
Example: a TECH.40 or TECH’N’ROLL leaf 1 200 mm wide requires a height of at least 1 350 mm under the ratio rule.
For TECH’N’ROLL, the minimum height of 1 400 mm still applies.
Maintenance and use.
Simple care.
Enlarge the sheet and diagrams ↗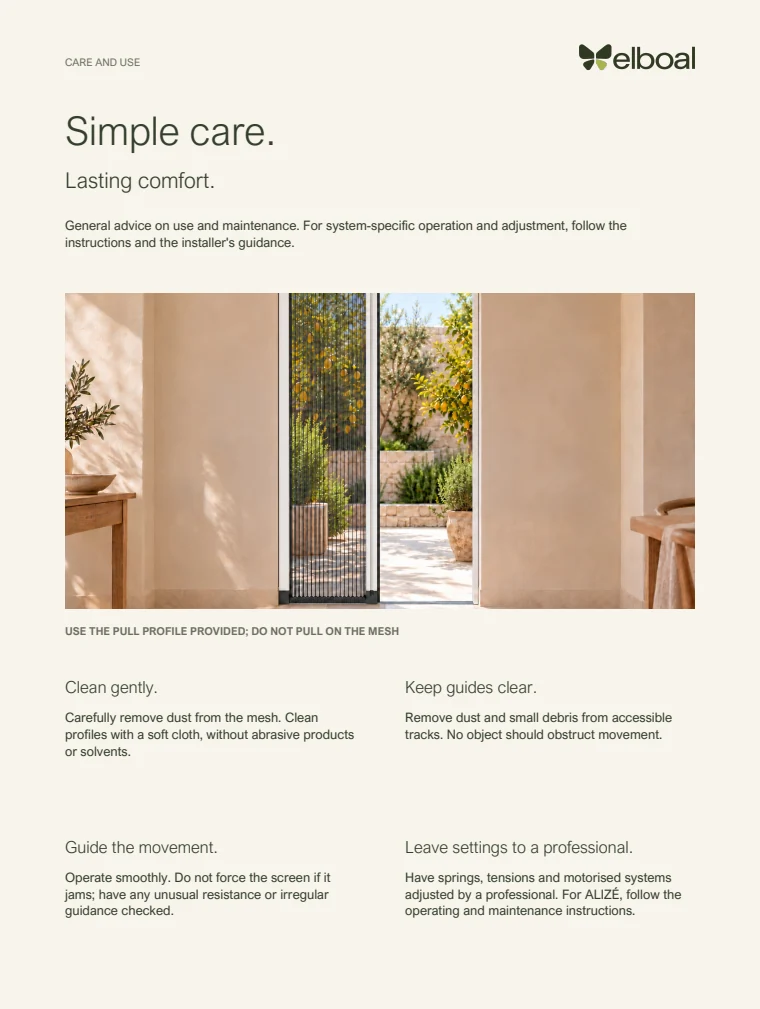
Read the full technical sheet text
CARE AND USE
Simple care.
Lasting comfort.
General advice on use and maintenance. For system-specific operation and adjustment, follow the
instructions and the installer's guidance.
USE THE PULL PROFILE PROVIDED; DO NOT PULL ON THE MESH
Clean gently.
Carefully remove dust from the mesh. Clean
profiles with a soft cloth, without abrasive products
or solvents.
Keep guides clear.
Remove dust and small debris from accessible
tracks. No object should obstruct movement.
Guide the movement.
Operate smoothly. Do not force the screen if it
jams; have any unusual resistance or irregular
guidance checked.
Leave settings to a professional.
Have springs, tensions and motorised systems
adjusted by a professional. For ALIZÉ, follow the
operating and maintenance instructions.